Make & Take Sneak Preview

Here it is – a sneak peek at two of the three projects that we will be making on March 2nd for the Vancovuer Papercrafters Meetup.

Aaaaannnndddd drumroll please………………………

Project #1:  Treat Holder / Candy Favor Box

Image

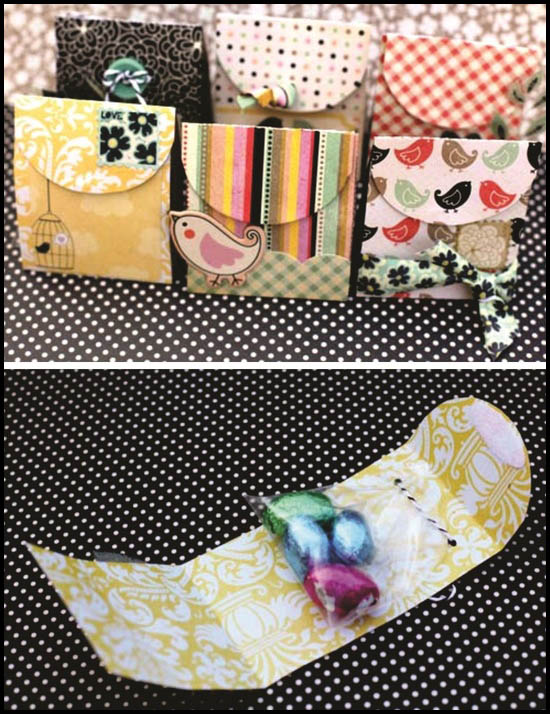
We will be making these little treat bag / favor boxes from the Twitterpated Designers Series Paper.  I love that these are super easy, easy to make multiples at one time, and do not cost a fortune to replicate!  You can at least three or four from ONE single sheet of 8.5 x 11 card stock!
(I will be supplying the treats for these projects for the class – however if you have an allergy to chocolate, or would like to bring your own please feel free)

Project #2:  Swallowtail Butterfly Card

Image

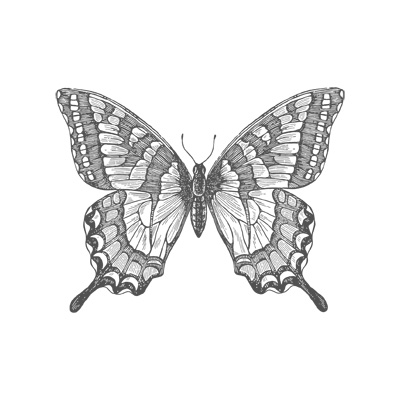
Since I have not been able to decide on exactly WHICH card we will be making for the class, I will only show you which stamp we will be using 😉
This Swallowtail stamp is quite large, and covers almost the entire A2 card size.  For examples on what can be made with this beautiful stamp check out my Pinterest board where I have put together a few lovely examples.  We may even be making one of them in the class.

I have tried to make sure to pick projects that are easy to replicate, and that will be fun for both beginners AND more experienced crafters.

I am really looking forward to our Make & Take event & meeting everyone!

See you all March 2nd!

Critter Coloring: Kittehs

So I have been on a crazy coloring binge since I have discovered the blending technique using colored pencils & baby oil from my post here

I fell in love with the critter stamps from Penny Black – the hedgehog, kitties, mice and critters are just about the cutest things EVER and are versatile enough to use for any age & occasion card!
I have found that Simon Says Stamp is the best place to get them online (other than Ebay) – great prices and even BETTER shipping!  Being Canadian I really appreciate when sellers can offer reasonable rates. 

Ok – enough of the hype, here is my latest creation. 


ImageI used only colored pencils & baby oil to color it.  I love that it looks like a cross between watercolor pencils & Copic (or alcohol markers).  Best of both worlds I think!  My boyfriend (yep, he’s *that* awesome) came up with the idea to fussy cut the balloons them pop them up with pop dots. 

The inside has a white matte to cover the ribbon, and I used the “Celebrate” sling mount from the Outlined Occasions set from Stampin Up’s 2011 Sale-A-Bration.


Stamp sets used:  It’s Your Day by Penny Black Inc

Eureka! Alternative to Copic & Alcohol Markers!

WOOOO HOOOOO!! Party in the craft room today!! I *finally* found a method of coloring stamped images that did not require a thousand dollar investment!!

All you need: Standard pencil crayons, baby oil & blender tips (called pen or marker nibs)

Seriously. That’s it.

Thanks to Madame Wong‘s post today on how to blend colored pencils in a similar manner to Copic coloring or alcohol markers in general, I was able to create this card:

Penny Black Its Your Day Cat Balloon Card

Penny Black stamp colored & blended with Crayola Pencil Crayons

My foray into coloring with my new Prismacolor markers wasn’t NEARLY as successful – the set of 48 I got did not have enough shades of one color to allow for a proper gradient blend.

Here is the video that madame Wong posted showing a tutorial on how to blend your pencil crayon coloring:


Here are a few additional tips to coloring & blending your pencil crayon coloring:

  • If you want to show texture (like fur in my example), then be careful not to over blend
  • Use only a pinpoint amount of baby oil – the more oil you have on your tip, the more it will blend your work. go over your colors a few times instead. Better to have not enough, than too much blending. And yes, you can blend too much. Too much blending = smeary, smudgy looking work
  • The better quality pencils you use, the richer your colored image will turn out.
  • I used Whisper White card stock from Stampin Up, but plain old card stock from Michaels also worked when I tested it.


Materials for my card:

STAMP: Penny Black (clear mount) “It’s Your Day”INK: Black Memento Archival Ink
COLOR: Crayola Pencil Crayons
BLENDING: Household standard type Baby Oil & Marker / Pen Nib refills (see video for other types of blenders you can use)
PAPER: Recollections (I don’t know the colors)
EMBOSSING FOLDER: Cuttlebug Spots & Dots

**EDIT UPDATE**

After some requests, here is a picture of the blenders that I use. I am Canadian & got these at my local Michaels. (I looked for the tool that was used in the video but I couldn’t find it.)


20130210-113055.jpg

Stampin Up Owl Punch Card – Owl Always be Your Friend

Does the owl punch ever get boring?! I freakin LOVE this punch!! So many different uses, for the owl alone!  Not coutning the different critters you can make using the shapes from the punch.  Penguins, bears, devils – you name it, someone has figured out how to make it with the owl punch.  I have a whole board on Pinterest dedicated to it!  Check it out:  Owl Punch

I belong to two groups on Facebook that are about sharing ideas & examples of Stampin Up! cards and creations. Friends of Stampin Up hosted a swap this month, with a “friendship” theme.  Here is the card I made for the swap:

Stampin Up Owl Punch Greeting Card
Front of Stampin Up Owl Punch Greeting Card
Stampin Up Owl Punch Greeting Card
Inside of Stampin Up Owl Punch Greeting Card

I have a few more cards to send out so I’m off to my Pinterest inspiration boards to search for new ideas & inspiration.

Until next time!  ❤

Some brilliant and VERY useful tips on how to get a perfect stamped image from your stamps & Stampin Up ink pads every time!

periwinky's cloud

Last month, I excitedly gifted myself four sets of the foam Stampin Up ink pads. I fell in love with the pads’ smooth deep finish at a stamp camp last fall and when Kim Morris offered a 15% rebate on her blog, I pounced. (Kim provides amazing customer service – even though she lives halfway across the country, she spent so much time helping a total nube – me! – figure out how to use all these ink pads! If you don’t have a demonstrator, I highly recommend her.)

So… the last few weeks have been frustrating for me because my solid images would come out with even coverage but very smudgey lines OR crisp lines with incomplete images. As I mentioned in a previous post, this awesome fellow stamper who just happened to be in line behind me, gave me an impromptu tutorial yesterday and by jove, I…

View original post 486 more words

Who wants free Stampin Up products?!


Sale-A-Bration +  Stampin’ Up!’s 25th anniversary = the best time to host a Stampin’ Up! party!

  • Get FREE Silver Glimmer Paper when you host a $200 workshop! 
    That’s only $25 per person in an 8 person workshop
  • Get a FREE hostess bundle when you host a $525 workshop! 

Hostess Bundle Details:
The Hostess Bundle includes

  • Madison Avenue Stamp Set (wood- or clear-mount)
  • Sycamore Street Designer Series Paper
  • Sycamore Street Ribbon & Button Pack

Make & Take: Spring / Easter Edition

** SAVE THE DATE **

I will be hosting a “Make & Take” event Saturday, March 2 at the Vancouver Public Library central branch.

Using a set from the current catalog, I will be demonstrating 3 completely different cards using one stamp set.

Each participant will get:

  • All materials needed to create 3 different cards
  • Detailed instruction sheet on how to re-create these cards at home
  • Complete supply list
  • A morning of creativity & fun!

This class is free with a $25 order, otherwise the cost to participate is $15 materials fee

Classes are limited to 8 people so please be sure to register early to ensure your spot!

Click here to register:  http://www.meetup.com/Vancouver-Stamping-Cards-Papercrafts/

Crazy for Coloring!

Coloring.  Not just for kids anymore!  I just recently acquired a set of 48 Prismacolor markers.  These are very similar to Copic markers – they are alcohol based ink which allows for blending and non-streaking when filling in.

Image

Thanks to the brilliant Darlene Devires and her tutorial post showing step-by-step instructions on how to color with copics markers (or Prismacolor in my case) I was able to color this Mouse stamp that I had got to make boyfriend a Valentine’s Day card with.

And here is my first colored image using alcohol markers:

Image

Those penciled notes you see in the top left corner are my notes with each of the colors I used to create this image so I know for next time what the best colors are to use.

Yay!