Lawn Fawn Puffy Stars Baby Shower Card

My partner’s niece was having her baby shower this weekend and I wanted to create a card for her.

The gender is a surprise so I needed something gender neutral – pale yellow is always a perfect choice!

Paired with some punched dots in champagne gold, I wanted to keep it nice and simple.

The inside stacked sentiment is from My Favorite Things All-Occasion Scripted Greetings and added just enough to the inside while still leaving lots of room for a personal message.

Valentine’s Day Bee Mine Candy Tag Pouches with Paper Smooches & Lawn Fawn

Paper Smooches Lawn Fawn Bee Mine Valentine's Day Candy Tag Pouch by Wendie Bee of Stamp Right UpWhen I saw the project that Jennifer McGuire did using these Paper Smooches dies I knew I had to make them too! With Valentine’s Day coming up, I was inspired to take her project and run with it – and that’s when I came up with making the tag in to a pouch! While Jennifer’s project was super cute with the Burt’s Bees, I had just recently done a project with chapstick, so I decided to put lollipops in the pouch; but you could put anything you wanted in there :).  Die cutting fun foam was much easier than I thought, and I only needed to run the foam through my big shot once and it cut through perfectly.  I also decided to use the heart outlines that I got when I die cut the red foam to fill on some of the space on the front of the tag.  I just used my paper snips and trimmed off the top part of the heart & adhered them down with the matte  medium.  Having the precision tip applicator bottle made it much easier to apply the adhesive where I wanted it and not get my project all goopy.  When I went to choose a sentiment, I knew the Bee Mine stamp set from Lawn Fawn was a perfect addition for the pouches.

Once I had created the front of the tag, I die cut another tag and adhered it to the back with a strip of Scor-tape.  I decided that tape would be best rather than liquid glue as I needed something strong since there wasn’t a lot of room to put glue so as not to interfere with the size of the pocket too much.  If you don’t have scor-tape at home then you could use liquid glue, like TomBow – just make sure you give the project ample time to completely dry.


Here is a picture of how I applied the tape to allow for enough room inside the pouch.  You could stamp a To / From stamp on the backside of the pocket, write a personalized note or just leave it blank.

Paper Smooches_Lawn Fawn_Bee Mine_Valentines Day Candy Tag Pouch_Wendie Bee_Stamp Right Up

Once I had everything assembled, I decided to add some Wink Of Stella to the hearts, because you know – a little glitter is always better 😛

Here are the finished projects – to see a full tutorial on how to create the front portion of the tag, you can check out Jennifer’s video here.  There is also a full supply list below if you would like to make these yourself at home ❤


Paper Smooches Lawn Fawn Bee Mine Valentine's Day Candy Tag Pouch by Wendie Bee of Stamp Right Up

paper-smooches_lawn-fawn_bee-mine_valentines-day-candy-tag-pouch_61

Paper Smooches Lawn Fawn Bee Mine Valentine's Day Candy Tag Pouch by Wendie Bee of Stamp Right Up


http://static.inlinkz.com/ppr.js

Lip Balm Chapstick Holders Party Favors Video Tutorial

Lawn Fawn_Bugs And Kisses_Chapstick_Lip Balm_Holder_Gift

This gallery contains 4 photos.

Back during the holidays I made some chapstick stocking stuffers – they were such a hit I thought I would create a quick video tutorial to show you how easy they are to make.  The projects I am making are … Continue reading

Lawn Fawn Pillow Box Die – Halloween & Thanks(giving)

Lawn Fawn’s pillow box die has now become my go to die for anything party favor, candy box, or even a gift card or a coffee card – it’s the perfect size to fit any standard sized gift card as a matter of fact. I just LOVE this pillow box.  Lawn Fawn never disappoints, and this one really hit it out of the park for me!

The die takes less than one half of a 12×12 sheet of cardstock, and create score lines that make the box ridiculously easy to assemble.  One strip of tape or Tombow and that`s seriously it.  I love how the top of the pillow box opening has a little notch in the underside flap to make it easy to open.  And the semi-circle scored perforations make it super easy to fold the tabs down when you’re ready to close it too.

With fall / autumn quickly approaching – and people are now thinking about pumpkin spice lattes ( 😛 ) I had so many ideas on hwo to use this pillow box die!

I made two Halloween party favors, or candy boxes; and one fall themed pillow box that could be equally as good for either a thanksgiving hostess gift, or just a thank you gift with a Starbucks coffee card inside!

Here are my projects: two Halloween party favors or candy boxes, and one that could double for either a Thanksgiving hostess gift, or just a Thank You gift with either candy, a gift card, jewelry, you name it! The sky`s the limit with this adorably perfect pillow box.


This first box I wanted to try and make something that would be easy to replicate – for a classroom treat, or party favor.  Using the Trick or Treat stamp set, I stamped out the candy corn in Lawn Fawn’s new Pumpkin Spice ink, and filled in the color with my Spectrum Noir markers (OR3 & CT2).  The bat was stamped in Black Licorice Lawn Fawn ink and die cut wit the newly released coordinating dies.  For the focal sentiment, I stamped it in the new Sugar Plum ink, and die cut it out with Lawn Fawn’s stitched circles.  I punched a small hole in the circle, popped up both my little candy corn and my bat, and tied it closed with the Lawn Fawn Spooky twine.  Their twine is awesome because it’s made from hemp, making it thicker than regular bakers twine.  What does that mean? That makes bows easier to tie, and they will stay put after you have positioned them! (yay!)

Lawn Fawn_Pillow Box Die_ Trick Or Treat_Halloween_Wendie Bee_Stamp Right Up

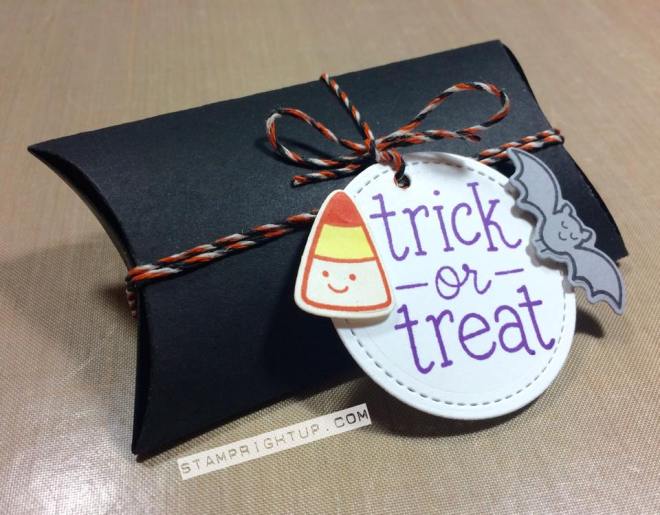
Lawn Fawn Pillow Box Die using Trick Or Treat stamp set for Halloween by Wendie Bee of Stamp Right Up


For my second Halloween box, I stamped out my own backround paper using the Trick or Treat stamp set in Lawn Fawn’s new Doe ink.  The belly band for the pillow box I cut a 2″ wide strip from the new Let’s Polka In The Dark mini 6×6 pad.  From the same pad, I pulled out a witches brew sheet and die cut circle for my racoon that was stamped from the Holiday Party Animal set.


Lawn Fawn_Pillow Box Die_ Holiday Party Animal_Halloween_Wendie Bee_Stamp Right Up

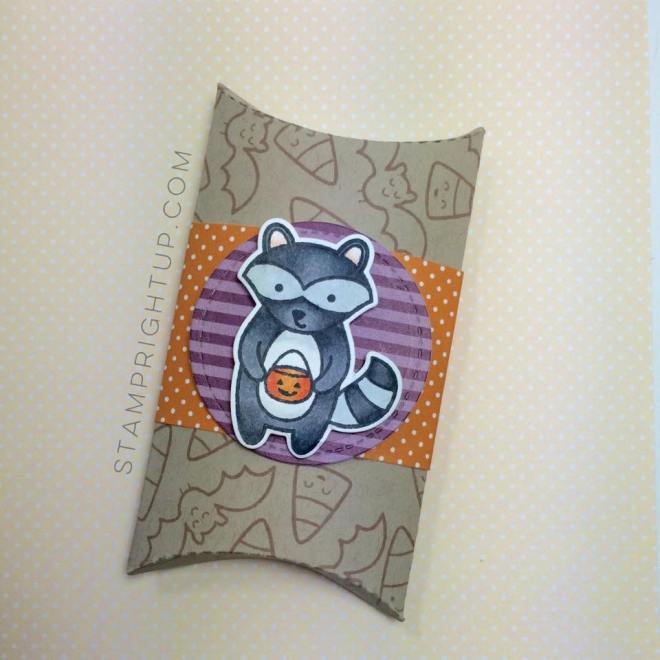
Lawn Fawn Pillow Box Die with Holiday Party Animal stamp set for Halloween candy box or party favor by Wendie Bee of Stamp Right Up


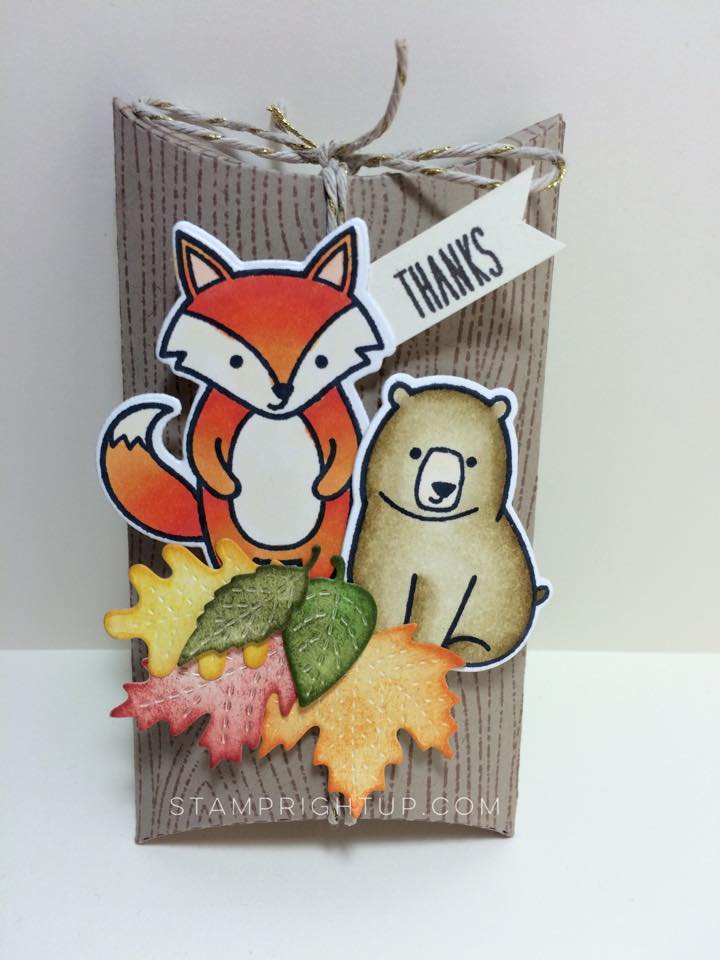
This box was created with fall / autumn in mind – but I wanted to make it versatile so that it could be either Thanksgiving OR just a regular Thank You gift box.  Using the wood grain’s backdrops set I stamped the entire pillow box after I die cut it in Doe ink.  The new Mini Stitched Leaves came in handy as accents for my Fox (from Party Animals) and my Bear (from Love You S’more).  Die cutting each leaf in a vanilla card stock, I blended distress inks onto each leave to create color and really bring out the stitching.  The Thanks sentiment was also from the wood grain backdrops set as well.  Finished off with Lawn Fawn’s Gold Sparkle twine I was super happy with the finished project!

Lawn Fawn Pillow Box Die using Party Animal & Love You S'More stamp for Thanksgiving or coffee card thank you or hostess gift Holder_Wendie Bee_Stamp Right Up_macro

Lawn Fawn Pillow Box Die using Party Animal & Love You S’More stamp for Thanksgiving or coffee card thank you or hostess gift Holder_Wendie Bee_Stamp Right Up_macro

Lawn Fawn_Pillow Box Die_ Party Animal_Thanksgiving_Pumpkin Spice Latte Coffe Card Holder_Wendie Bee_Stamp Right Up_macro

Lawn Fawn Pillow Box Die using Party Animal & Love You S’More stamp for Thanksgiving or coffee card thank you or hostess gift Holder_Wendie Bee_Stamp Right Up_macro

As always, your comments & feedback are welcome and appreciated! Thank you for reading this far & I hope see you again for my next project!

Stampin Up’s Calling All [Super] Hero’s Mini Journals

As soon as I saw the Calling All Hero’s photopolymer set by Stampin Up I knew i had to have it!!  I had so many ideas on what to do with it – and i loved that it worked for both boys AND girls.

My friend Eric and his two best friends make an annual pilgrimage to the Fan Expo (Comic Con) in Toronto every year.  It’s HUGE and there is SO much to see.  So I thought it would be cool to make them a memento that would be as practical as it was cool. (At least I thought so anyway :P)

And the mini craft journals project began.  I started planning weeks before and used scraps of computer paper to test layouts – I think I tried about 6 different designs before I came up with this one.  I just love that this set is  photopolymer!! Being completely transparent I was able to position the letters perfectly without having to use a position-er or make costly mistakes!

Here is the finished journals – I made one for each of them and personalized it with their names.  I included pop rocks and candy with them in the package when I sent them too.


Calling All Hero's Mini Journal by Wendie Bee of Stamp Right Up

Calling All Hero’s Mini Journal by Wendie Bee of Stamp Right Up

Here’s the best part – you can make these too!! It was easy once I knew the layout – just needed one stamp set and two basic ink colors!

Here is a list of what I used – and don’t forget you can shop online 2-4-7 by clicking on any of the links.

Comic Con Fax Expo Mini Craft Journal Project supplies list:

Calling All Hero’s photopolymer stamp set

Memento Black Ink

Real Red Ink

Mini Craft Grid Journals

Stampin Up Tea Bag Dispenser Gift Box

With Mother’s Day coming up, I thought this tea bag dispenser gift box would be a great Stampin Up project to demonstrate.  The measurements are quite fiddly, but the finished project is well worth it!  Thanks to Heidi at Running With Scissors for the instructions.  Being still relatively new to papercrafting myself, I typed up the instructions in an easy to follow PDF. Click to download tutorial here:  Stamp Right Up Tea Bag Dispenser Instructions

I was super excited to use a product from the NEW Stampin Up catalog, which is officially released May 31, 2013.  We are given a few products available for pre-order and I snatched up the opportunity.  Can you spot the new item?!…

It’s the flower blossom embellishment on top of the lid! I made it with the new Blossoms & Buttons simply pressed molds and pool party reinkers. I just LOVE LOVE LOVE the fact that we are now going to create embellishments in ANY color Stampin Up carries!! Now, all you have to do is order the reinkers and we can make our own buttons & flower embellishments!!  There are 3 different sizes for buttons and 3 sizes for the flower blossoms, my example show on the lid is the medium sized ~ they are about the size of a nickel – I used pool party reinker to color the clay.   The clay is EXTREMELY lightweight; it almost feels like styrofoam… It is a silicone compound.
So they really are perfect for cards or any paper project!  I personally tested each design to see how durable they are:  the buttons I can literally fold in half and they didn’t break or crack; the flower cracked a little when folded completely in half, but it only shows if bent – so these are very forgiving and durable and will most definitely make it through even the most unforgiving postman.

I cannot WAIT to show you more of these in the next few weeks!  Official orders for the new catalog begin May 31st – I will have electronic AND digital copies ready as soon as we are able to release them. If you would like to be included on either mailing list for official hardcopy, or digital copy of the catalog please comment below as well and I will make sure you are in the know!

Mother's Day Stampin Up Tea Bag Dispenser Gift Box

Mother’s Day Stampin Up Tea Bag Dispenser Gift Box

Until next time stampers!

** As always, comments are welcome and appreciated **