Spellbinders Spring In Kyoto Collection: Kokeshi Dolls

These gorgeous projects are brought to life with the enchanting Spring in Kyoto collection from Spellbinders — and let me tell you, this die set is nothing short of magical!

Inspired by the charm and tradition of Japanese Kokeshi dolls, the intricate layering dies let you build sweet, stylized figures with endless customization options. From the delicate fans and hair accessories to the beautifully detailed kimonos, this set allows for both minimalist elegance and maximalist flair — depending on your creative mood.

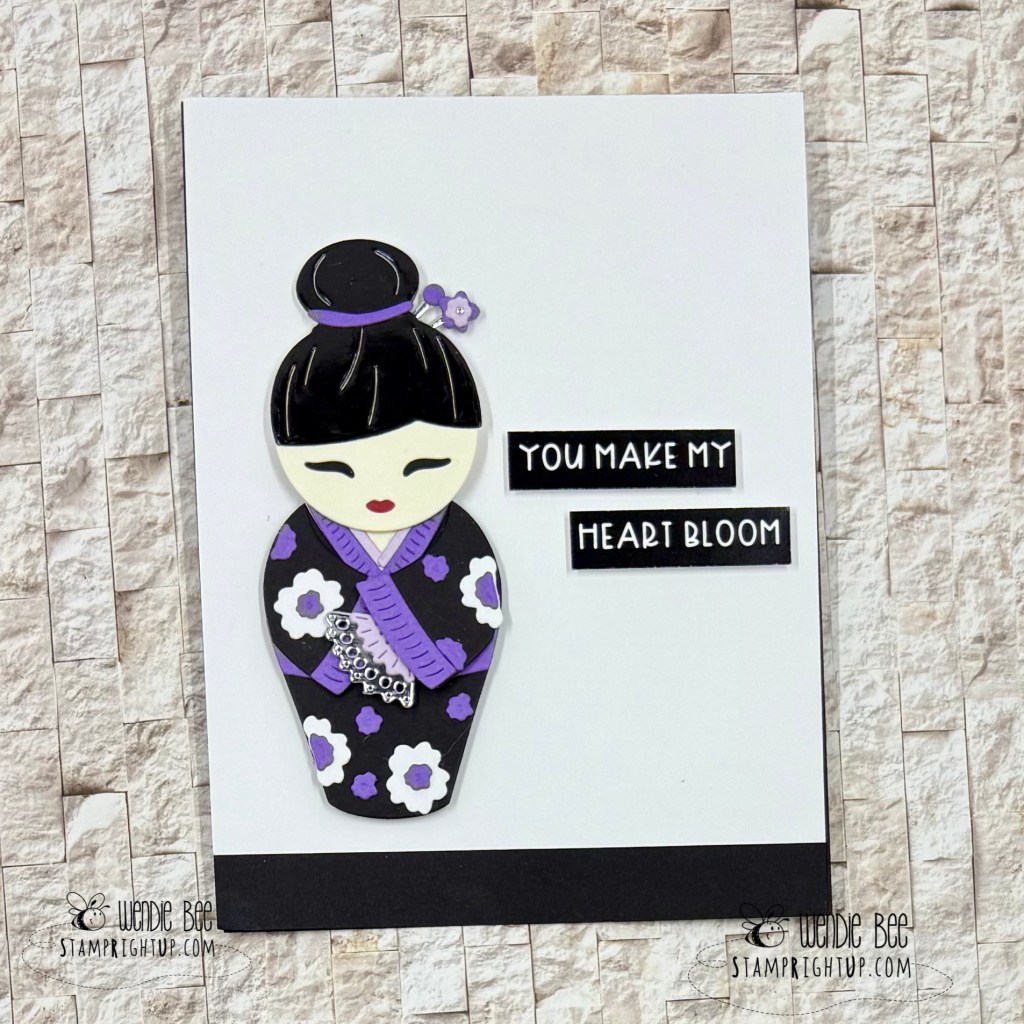
For my first card, I went clean and simple with a bold black, white, and violet palette, letting the doll and sentiment truly shine against a crisp background.

The second design leans fully into the ornate beauty of the collection, featuring layered fans, stitched blossoms, and metallic accents that make it feel like a miniature art piece.

Whether you’re crafting for love, friendship, or just to celebrate beauty in the everyday, these Kokeshi dies are the perfect focal point for a heartfelt handmade card.

✨ Craft tip: Paper piecing with glossy cardstock adds that perfect lacquered finish to mimic real Kokeshi dolls — and foam tape gives just the right amount of dimension.

Would love to know — are you team minimalist or maximalist when it comes to cardmaking?

Thanks for stopping by!

💮 Wendie Bee | @stamprightup

Lawn Fawn Fruit Salad Mini Slimline Card Collection

Fruitful Trio of Cards with Lawn Fawn! 🍒🍓🍋 Hello crafty friends! Today I’m excited to share a berry sweet set of cards I made using some of my favorite Lawn Fawn goodies! These fruity cards are bursting with color and … Continue reading

Concord & 9th Our House Collection

If you’ve ever dreamed of building the perfect little paper house, the Our House collection makes it easier (and more fun!) than ever! This charming card was created using the Our House Dies, and I had so much fun personalizing it with all the delightful add-ons.

This die set is packed with customizable details — from interchangeable window shapes and scalloped roof tiles to flower boxes, balloon clusters, and banners! Whether you want to create a cozy cottage, a festive celebration scene like this one, or a wintery holiday home, the possibilities are endless.

The dies are perfectly sized to fill an A2 card front, but you can also use them to create a free-standing house-shaped card for something extra special. I used the coordinating Our House Extras Dies to add balloons and that festive banner, which I stamped using the Our House Stamp Set. The windows were lightly ink-blended for a soft glow effect, and the flower boxes add that perfect finishing touch.

Want to step it up even more? The Our House Embossing Folder adds dimensional brick textures for even more realism and charm.

Whether you’re making a card to celebrate a birthday, new home, retirement, or just because — this collection lets you create a scene full of personality and joy.

💡Pro tip: Mix and match elements with other seasonal sets for year-round versatility!

Thanks for stopping by — and don’t forget to tag me if you make a project using this set. I love seeing your creations!

@stamprightup

Sale-A-Bration Workshop: Quick & Easy Party Favors

Hiya Stampers!!

I have made some SUPER awesome projects lately – thankfully! There was a spell there where I wasn’t feeling very inspired  :S

With Sale-A-Bration going on, I thought I would make a specialized workshop with projects using only products that are available during Sale-A-Bration so I can give people a chance to ‘try before you buy’ – and get an opportunity to to see a variety of projects.

Here is the first project for the workshop:

Stampin Up Sale-A-Bration Lollipop Treat Holder Party Favor Stampin Up Sale-A-Bration Lollipop Treat Holder Party Favor created by Montreal Quebec Stampin Up Demonstrator Wendie Bee

Here is what I used to make these awesome lolli pop treat holder /party favors:

Stamps:  Stampin Up Another Thank You (Photopolymer)
Card stock: Sale-A-Bration
Inks: Stampin Up Basic Black
Markers:  Basic Black (dash lines)
Misc: Flower punch from bitty punch pack, pearls, Sycamore Street Ribbon in Pool Party & Calypso coral

As always – your comments are welcome and appreciated!!

——————

Want to create this card yourself?  I can show you how!  Contact me anytime to RSVP FOR A WORKSHOP

Or – to order any of the supplies used for this project call me today to place your order 514-482-4653 or email at stamprightup@hotmail.com

I can ship anywhere in Canada, including Quebec for as low as 10% of your order (before tax)!

Now it’s even easier to shop with me!  I accept Credit cards, email money transfer and Paypal.

Stampin Up: Speech Bubble Dies & Retro Fresh Washi

Hiya Stampers,

Just a quick post today to share a card I made for Eric’s Grandmother who spoiled us with cake & presents on our most recent visit.  I love spending time with family  ❤

They have a budgie bird named Pom Pom, so I wanted to incorporate a bird in the card somehow… He is bright colors so I wanted to make sure the card reflected that as well.

Here is what I came up with:

Stampin Up retro fresh washi tape Merci / Thank You card by Montreal Demonstrator Wendie Bee Stampin Up retro fresh washi tape Merci / Thank You card by Montreal Demonstrator Wendie Bee

Stampin Up’s retro fresh washi tape made this card ridiculously easy & quick to make on the fly (last minute).  The only cutting of paper was the card base and first layer… the tape I just pulled off a piece and layered each design onto the card.  I used markers to clor the toucan bird, and fussy cut him out and adhering him using dimensionals

Here’s a really neat trick:  Here is how I created a layered effect for the speech bubble :

  1. Die cut bottom layer of speech bubble in solid colored card stock.
  2. Using the same die, I placed it on white card stock then with a pencil, traced the shaoe on the INSIDE of the die.
  3. With the “Remerciements” stamp set, I used the small ‘merci’ stamp, inked in tangerine tango, coastal cabana, soft suede & so saffron
  4. Finally, I fussy cut along my pencil lines and popped up the cut out piece using dimensionals

Thanks for stopping by. And don’t forget – your comments are always welcome and appreciated!!


———————————

Want to create this card yourself?  I can show you how!  Contact me anytime to RSVP FOR A WORKSHOP or to place your order. I can ship anywhere in Canada, including Quebec for as low as 10% of your order (before tax)!

Now it’s even easier to shop with me!  I accept Credit cards, email money transfer and Paypal.

Call me today to place your order 514-482-4653 or email at stamprightup@hotmail.com

Card Making Workshop: For The Birds

Using the owl punch from Stampin Up, this workshop will feature three different cards using one punch. I love this punch – it is so versatile that it was the very first item I bought when I started out!

Here is one of the three card projects we will be making.  I made this card a while ago and the blog post I wrote about it has gotten so much positive feedback that I thought I would include it as a workshop project!  There will also be a Birthday themed card and a wedding themed card using the owl punch as well.  Curious to know how you can use the owl punch to make these?  Register to the workshop and find out  😛

This class is suitable for all levels of crafting experience. All instruction will be done in English, however some stamps and catalogs may be available in French.

My workshops are located in the heart of Montreal in the Notre Dame De Graces (NDG) area.  I am easily accessible by transit and driving (just off the 20 or 15 / Decarie)

Click here to register or call me at 514-482-8543 7 days a week, from 9AM – 8PM EST

Stampin Up Circle Thinlit & Owl Punch

Holiday Sale & Free Tutorial

30% off Stampin Up's simply scored diagonal plate

This gallery contains 3 photos.

It’s the start of the Stampin’ Up! Holiday Sale where you can get 20-50% off fabulous products! Ok Stampers – you are going to want to download this  Holiday Sale List  now because there are some SERIOUS DEALS!!  OR CLICK … Continue reading

Quick Tip:Festive Flurry & Endless Wishes

Hiya Stampers!!

Just a quick tip for the day: when using Stampin Up’s the largest stamp in the new photopolymer set Endless Wishes, it coordinates almost perfectly with the smallest die from Stampin Up’s Festive Flurry set! If you have the magnetic platform it makes it super easy to line up too.

Talk about more bang for your buck!

I love it when I find alternate uses for all the great Stampin Up tools I have. If YOU have any great discoveries please post a summary & link to your blog so we can all share in the awesomeness!

Until next time Stampers!

20131102-083127.jpg

Join the fun – become a Stampin Up Demo for only $25

In celebration of Stampin Up’s 25th anniversary, there are some CRAZY promotions happening all month long.  One of the best ones:  BECOME A DEMONSTRATOR FOR ONLY $25

For two weeks only—October 7-21—join my Stampin’ Up! family for just $25! It’s an amazing opportunity to do what you already love doing anyway—and make a little money doing it (that never hurts!).

When you join Stampin’ Up! during this limited-time offer, you’ll get

  • $25 worth of products, plus business supplies that includes FREE box of Annual Catalogs & package of Holiday Catalogs
  • A 30 percent discount on your first order of $200 or more!
  • A 20 percent demonstrator discount everyday!
  • Access to all demonstrator tools including videos, tutorials and webinars

But, wait! There’s more!!

When you join MY team I also have added incentives – here are a few of the perks of being part of my team:

  • Monthly Canada wide online team meetings to go over promotions and talk about current issues
  • I provide one-on-one coaching and support to help you with tips to grow your business
  • SALES INCENTIVES – get FREE PRODUCT for every promotion you get!! For example:  $50 shopping spree for your first title promotion!

Plus, the friendships you’ll make with other demonstrators, customers, and hostesses, will be lifelong. Enjoy the benefits of fun, friends, and creativity!

Have questions before you join?  Call me at 514-482-8543 Monday – Friday 8AM to 8PM (Eastern Standard Time)

Join the Stamp Right Up demonstrator team for only $25

Join the Stamp Right Up demonstrator team for only $25

Stampin Up Circle Thinlit & Owl Punch Card

I was so excited when Stampin Up came out with these Thinlit flip-it style cards.  Each thinlit comes with various accessory dies.  I was super excited when I figured out that the scallop that comes with the circle thinlit bundle is exactly the same as the largest scallop punch (which I did not yet own)

Using the circle thinlit bundle, I made this card using the owl punch.  It is a bit of a learning curve to figure out how to cut the second layer, but once I figured it out I was quite happy with the result.

Once I make a few more of these cards, I will be posting a tutorial using these thinlits.  Be sure to stay tuned for that!

TIPS & TRICKS (PART 1)

  • I have found that if you use a 12×12 sheet of paper you will have considerably less paper waste / scraps left over.
  • For the base, if you do NOT have a magnetic platform for your Big Shot, cut a piece of paper 1/8″ longer than needed
  • For the second layer – I cut the crumb cake at 5 1/2 x 5, then trimmed any excess of the top & bottom
  • You can use your 2 1/2″ circle punch for the middle circle – it will leave about a 16th of an inch space as you can see below
  • The scallop die is exactly the same as the 2 3/8″ scallop punch in the annual catalog

Stampin Up Circle Thinlit & Owl Punch

Stampin Up Circle Thinlit & Owl Punch

Here is what I used to make this card:

STAMPS:

  • Wood grain background stamp
  • Itty Bitty Banners

INKS:

  • Chocolate chip
  • Baked brown sugar (markers – on sentiment banner)
  • Old olive (markers – on sentiment banner)

PAPER:

  • Chocolate chip
  • Crumb cake
  • Very Vanilla
  • Old olive (for leaves)
  • WIld wasabi DSP (for owl vest)
  • black (for eyes)

TOOLS:

  • Owl punch
  • 2 1/2 ” circle punch
  • Little leaves framelits