Home Sweet Home with Lawn Fawn

I have been SOOOO busy lately that I haven’t had time to post my latest creation using my Home Sweet Home set by Lawn Fawn!!  I love this set – it is so versatile that you can use it for “We’ve Moved” cards, new baby cards, or like my example – all occasion / just because!

Summer is hte time for new releases it seems, and Lawn Fawn will be debuting their new line May 4th.  *does happy dance*  There are sneak previews all this week on their blog – you should check out the nifty paper tearing tool that they feature today.  Very cool.


Home Sweet Home with Lawn Fawn

Just Because ~ Home Sweet Home with Lawn Fawn


As always, your comments are welcome & appreciated!

Until next time stampers!

Stampin Up: May Flowers Workshop for Mother’s Day

I am pleased to say that this weekend marks another successful workshop!  I had the pleasure of running a private workshop with Leyla – it was a great experience for us both. As she is new to paper crafting, card making and Stampin Up in general, I really loved having the opportunity to work one on one with her to show her all the tips & tricks that I have learned along the way.

When I was planning the workshop, I tried to put a lot of thought in to which techniques would be good to work with for beginners while still making fun & appealing projects.

The theme of the workshop was “May Flowers” so I wanted to make a card similar to one that my upline had made with the Fancy Flower punch.  I found this video tutorial from Dawn on how to make a different style of a paper flower and LOVED the look of this technique.
I added an extra step to Dawn’s tutorial and sponged the edges of each flower layer with crumb cake ink;  it is a bit time consuming to ink / sponge the edges, but it REALLY makes a difference and give the flower so much more dimension.  You could also use the coordinating ink to match your card stock, or use a contrasting ink to give it an extra punch of color.

Stamp Right Up Mother's Day Paper Flower Card

Mother’s Day Paper Flowers Card

Here’s what we used to make this lovely card:

  • Crumb Cake card stock (4.25 x 5.5)
  • Very Vanilla card stock (4 x 5.25)
  • Pretty in Pink ink (background stamped image)
  • Crumb cake ink (sponged on edges of flower petals & along edge of very vanilla mat layer)
  • Fancy Flower punch
  • Itty Bitty Banners
  • En Francais background stamp
  • Pink Pirouette card stock (flowers)
  • Champagne glimmer paint (on flowers)
  • Pearls
  • Twitterpated buttons


As always, your comments & feedback are welcome and appreciated!


Until next time stampers!


I love Lawn Fawn!!!

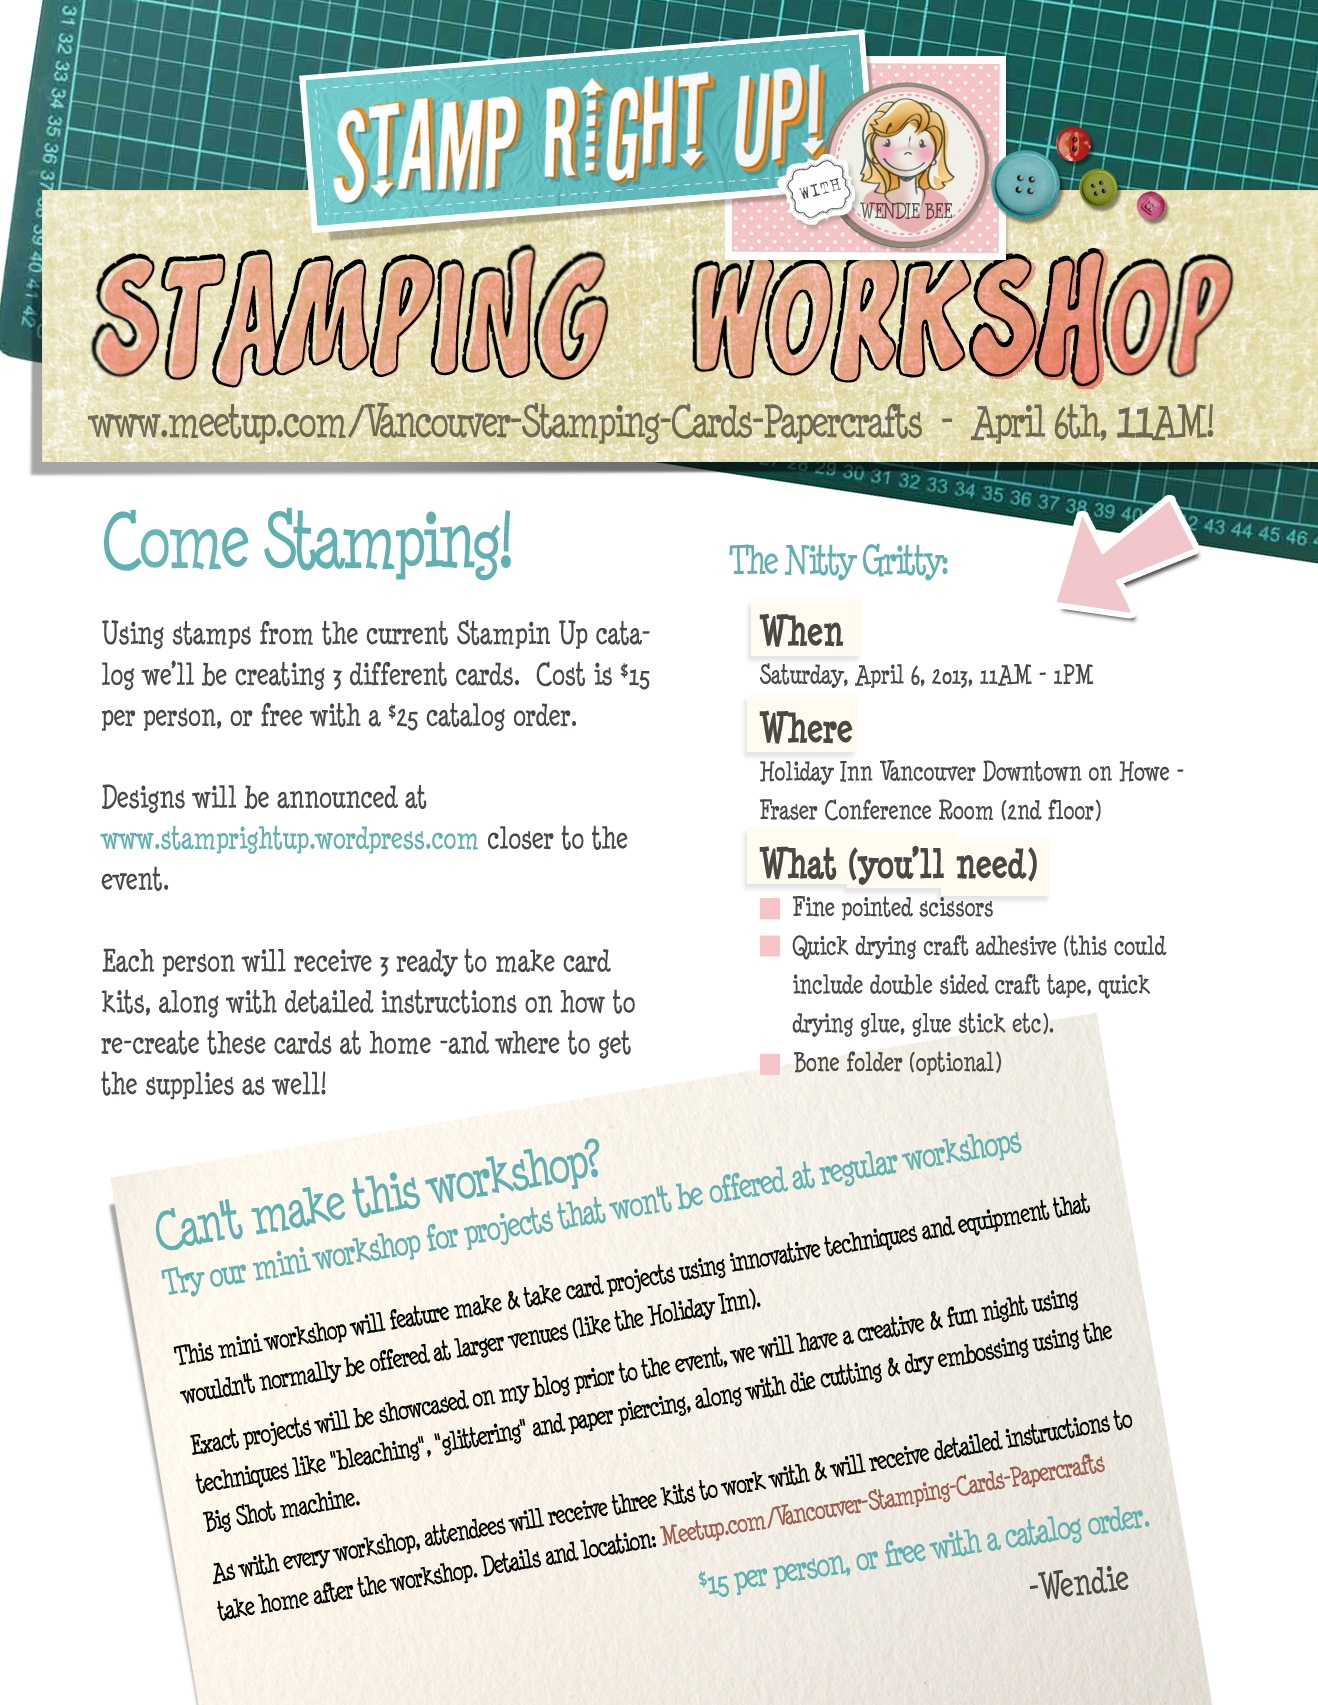
I love Lawn Fawn!!!  These are my creations from the new “Home Sweet Home” stamp set.  I really love that there is a matching die for so many of the stamp images too!!  And, the dies are unique in that there is a little bit of white space around image when die cut to look like they were fussy cut too.

This Home Sweet Home set is SOOOO versatile! I really love the assortment of ‘decorations’ in the set, it really allows you to create a unique, personalized project.  Check out Kelly’s intro video showing all the stamps, coordinating dies & different examples she shows.

Here is what I made with this great set so far:

3×3 Note Card

3x3 Note Card Home Sweet Home ~ Lawn Fawn

3×3 Note Card using Home Sweet Home stamp & die set from Lawn Fawn

3×3 Note Card supplies:

Scallop All Occasion Card

Scallop Card Home Sweet Home ~ Lawn Fawn

Scallop Card using Home Sweet Home stamp & die set from Lawn Fawn

This card was pretty much a direct case from Kelly’s card from the intro video; here is what I used:

  • Stampin Up Pool Party ink (to sponge background color)
  • Colored pencils using blending technique here
  • Lawn Fawn Home Sweet Home Stamp & Die set

There are two more cards-in-progress on my work table right now too.  I also have stamped a bunch of leaves, branches and many different houses – that way I can just go crazy designing cards.  It’s much easier once all the elements are all done to design cards layouts – I just place all the bits & pieces on with tweezers, then move tham around until I get a layout I love.  **Fun** !!!!

I have ordered the Summertime Charms stamp & die set as well.  I cannot WAIT to get it!!

Until next time stampers!

** Your feedback & comments are welcome and appreciated, so don’t be shy!**

Mini Workshop Materpieces

Look what my girls made in the Mini Workshop I hosted on Monday!  We had a great time – I mean really, how much more perfect can girls night out be when it includes great company & crafting?!

Each workshop I host as a demonstrator, I always create a tutorial / handout for the participants to take home with them after the workshop so that they can recreate the cards again at home.  As a little bonus for all you stampers out there, I have included a link to download the PDF tutorials on how to make each card from that workshop!  Some of the other cards I have featured in other posts also have a PDF tutorial – if you are interested in one, please comment below or message me & I can email you a PDf copy.

Bleached Swallowtail

CLICK HERE TO DOWNLOAD THE TUTORIAL PAGE ON HOW TO MAKE THIS CARD:
StampRightUp – Bleached Swallowtail Instruction Hand Out

Bleached Swallowtail on Pacific Point with En Francais background stamp

Bleached Swallowtail on Pacific Point with En Francais background stamp

What you’ll need to make this card at home:

  1. Pacific Point ink & card stock, as well as basic black card stock
  2. Swallowtail stamp
  3. Black embossing powder

Stampin Up Pinwheel Sizzlits

 CLICK HERE TO DOWNLOAD THE TUTORIAL INSTRUCTIONS ON HOW TO MAKE THIS STAMPIN UP PINWHEEL CARD: 

StampRightUp – Pinwheel Sizzlit Instruction Hand Out

Stampin Up Pinwheel sizzlits

Stampin Up Pinwheel sizzlits with Subtles DSP & stripes embossing folder

This card is super cute, but the pinwheel sizzlits can be a serious problem to put together… that is if you don’t know the trick to assembling them!  Check out this video on the easy way to assemble these little guys with ease and no frustration:  http://youtu.be/9PCjFyN7-qs

The other WAY COOL technique I taught the group was the “fork bow”.  Who knew you could use a fork to produce consistent, easy to make bows!!  I found this YouTube tutorial on how to make easy ribbon bows:  http://youtu.be/RBza9q1rKRo

Papillion Potpourri Window card

CLICK HERE TO DOWNLOAD THE TUTORIAL INSTRUCTIONS ON HOW TO MAKE THIS CARD:

StampRightUp – Papillion Potpourri Window Card Instruction Hand Out

Papillion Potpourri window card

Papillion Potpourri window card in pool party with Everyday Enchantment DSP and champagne shimmer mist

The picture of this card doesn’t do this card justice! We used the champagne shimmer paint to add a beautiful hint of shimmer to the front of the card.

Stampin Up Owl Punch: Night Owl’s

Stampin Up Owl Punch Card:  Night Owls

Stampin Up Owl Punch All Occasion Card: Night Owls

Have I mentioned how much I love this owl punch?!  This is my newest tinkering: Night Owl’s.  Boyfriend helped me out a bit (he’s a stellar artist so he always helps me polish my ideas).

This one was actually super easy once I had the layout done.  I found it was the best to punch all the pieces and lay them out first before sticking anything down permanently.

Here is what I used:

  • Stampin Up Two Step Owl Punch
  • Stampin Up Word Window Punch
  • Stampin Up Woodgrain background stamp (stamped in Soft Suede ink)
  • Crumb cake card stock (fence)
  • Pacific Point card stock (background mat)
  • Basic black (card base)
  • Owls made from:
    • Chocolate chip (body)
    • Old Olive & Razzleberry (vests)
    • Crumb cake & whisper white (eyes)
  • Moon (whisper white card stock & circle punch)
    • Sponge white craft ink around place where punched circle will go, then adhere white circle
  • Clouds (basic black ink & sponged using a scallop mask)

Your comments are welcome & very much appreciated!

Until next time stampers!

Workshop April 6th 2013: Project Reveal #1

Stampin Up Chalkboard technique

Photo courtesy & copy write of Feathertassel

When I found this ADORABLE version of Stampin Up’s chalkboard technique from Feathertassel I knew I had to demonstrate the chalkboard in my upcoming workshop!

So, stampers:  get ready! This will be a SUPER SUPER fun & creative project (one of THREE!)

Be sure to RSVP at Meetup.com – it’s free & easy to sign up!  I will be posting more sneak previews of projects for the workshop April 6 so be sure to check back!


Can’t make the April 6th date?  I am also holding a mini-workshop with limited space where I will be demonstrating projects using the Big Shot, along with bleaching & glittering techniques that are not able to be shown at the larger workshops. 

Midnight Musings

I have been so busy with life the last week I *finally* got to sit down at the crafty table! *does the happy dance*

I just got my Sale-A-Bration goodies and I thought I would tinker with a technique that I will be using in one of my workshops. I don’t know what it’s called – bit when done correctly it gives the appearance of movement to an image

Here is what I made:

20130306-222822.jpg

I cropped the background out (read: my messy craft table)- so it’s hard to see the crumb cake sponged edges that add to the vintage look & feel of this stamp set.

This was my first attempt with this technique & this stamp set so I think I will have another go at it… Tomorrow

Until later Stampers

🙂

Make & Take: Spring Edition

Our first workshop was a success!  It was a small group this time but we had a great time and learned new projects & techniques.  (Myself included!)

For this workshop we made 3 projects:

  1. Easter treat holder / party favor
  2. Owl card
  3. Swallowtail Butterfly card using ghosting technique

Here are a few pictures of my examples I used in class.

Easter treat holder using Stampin Up Twitterpatted Designer Series Paper

Stampin Up Peek-A-Boo Owl Punch Greeting Card
Image

Stampin Up Swallowtail clear mount stamp using Ghosting Technique

I will also be sending the attendees of the workshop a detailed guide on how to recreate these projects at home.  🙂

The next Card Making Workshop is scheduled for March 30th – click here for location & time