Stampin Up: Expressions & Circle Flip Card Thinlits Holiday Workshop

Every time a new Stampin Up catalog is released, I do a special workshop for my group to showcase some of the new items being released.

For each catalog release party, I always give a little gift as a thank you to my group as well.  Here is what I gave them for the Holiday Catalog 2013 release party:

Image

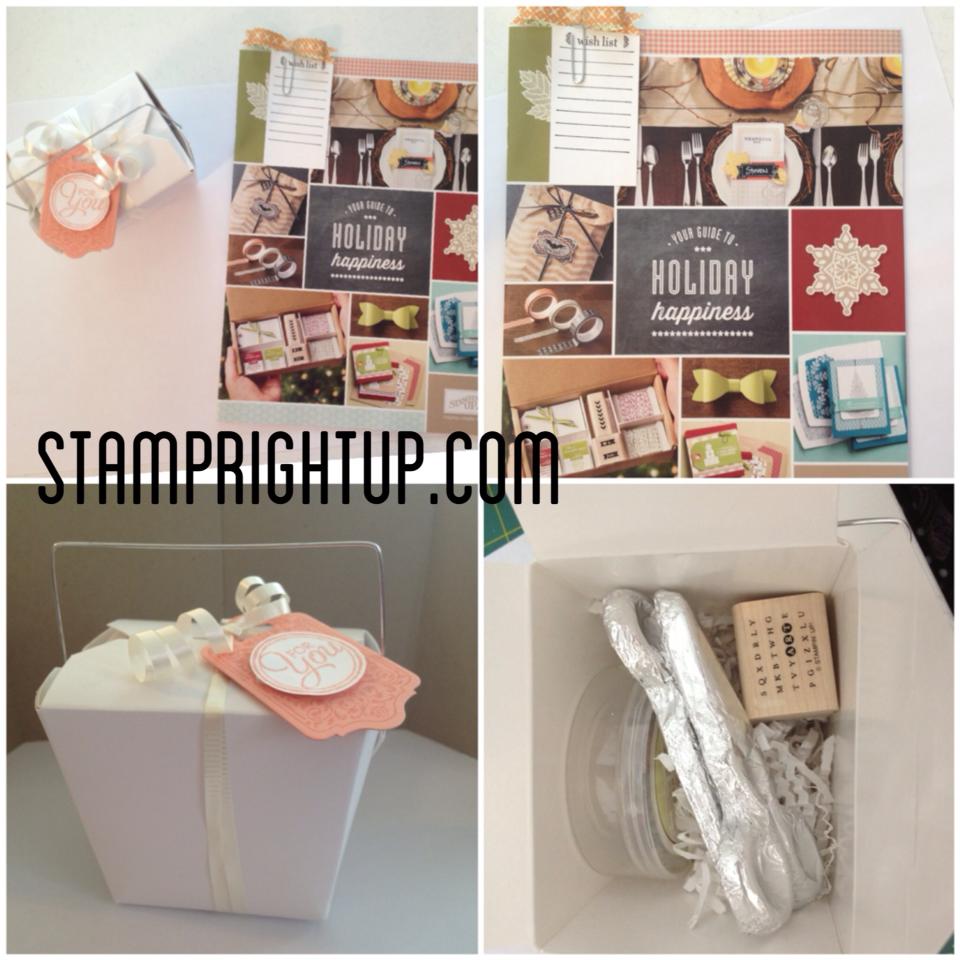
They got a Holiday Catalog, with a wish list stamped from the demonstrator business set, which I attached using the paper clips.  Recognize those paper clips?  That’s right! They are the same ones featured in the annual catalog!

For the thank you gift boxes, I included: one incentive stamp from the “best card ever” stamp set – available ONLY from a demonstrator, a package of Twitterpatted buttons, and two milk chocolate scissors which I made myself using Callebaut chocolate and molds I got from my local (and VERY awesome) confectionery genius Charlie’s Chocolate Factory

The take out  boxes I use for my jewelry making business Miss Kitty Creations.  I purchased them from Creative Packaging and I knew they would be a perfect fit for all the goodies I wanted to include.

We did three projects.  Here are two of the three.  This is the first one we made:

Stampin Up Expressions Love Thinlit card using simply pressed clay rose and buttons in Cherry Cobbler

Stampin Up Expressions Love Thinlit card using simply pressed clay rose and buttons in Cherry Cobbler

I cannot say enough about the Simply Pressed clay & molds!  Both the button and the rose were made using the Cherry Cobbler reinker and the clay.  While I LOVE the buttons in the current catalog, they can get quite costly if you need many at one time.  I bought the clay MONTHS ago when it was first released and I still have more than a third of the bag left.  I estimate that I have made at least 60 various pieces (if not more) with the molds, and they use next to NO ink from your reinker bottle.  Even the regals / dark colors which require more ink to get a perfect color match, you barely make a fraction of a dent out of the bottle.  They really are great!

Here is a tip that you MUST use when using these thinlits:  put wax paper between your card stock and the die each time you

cut with them.  You will have no problem getting the card stock die cut piece out, and it ensures you have a nice clean cut with no rough edges.


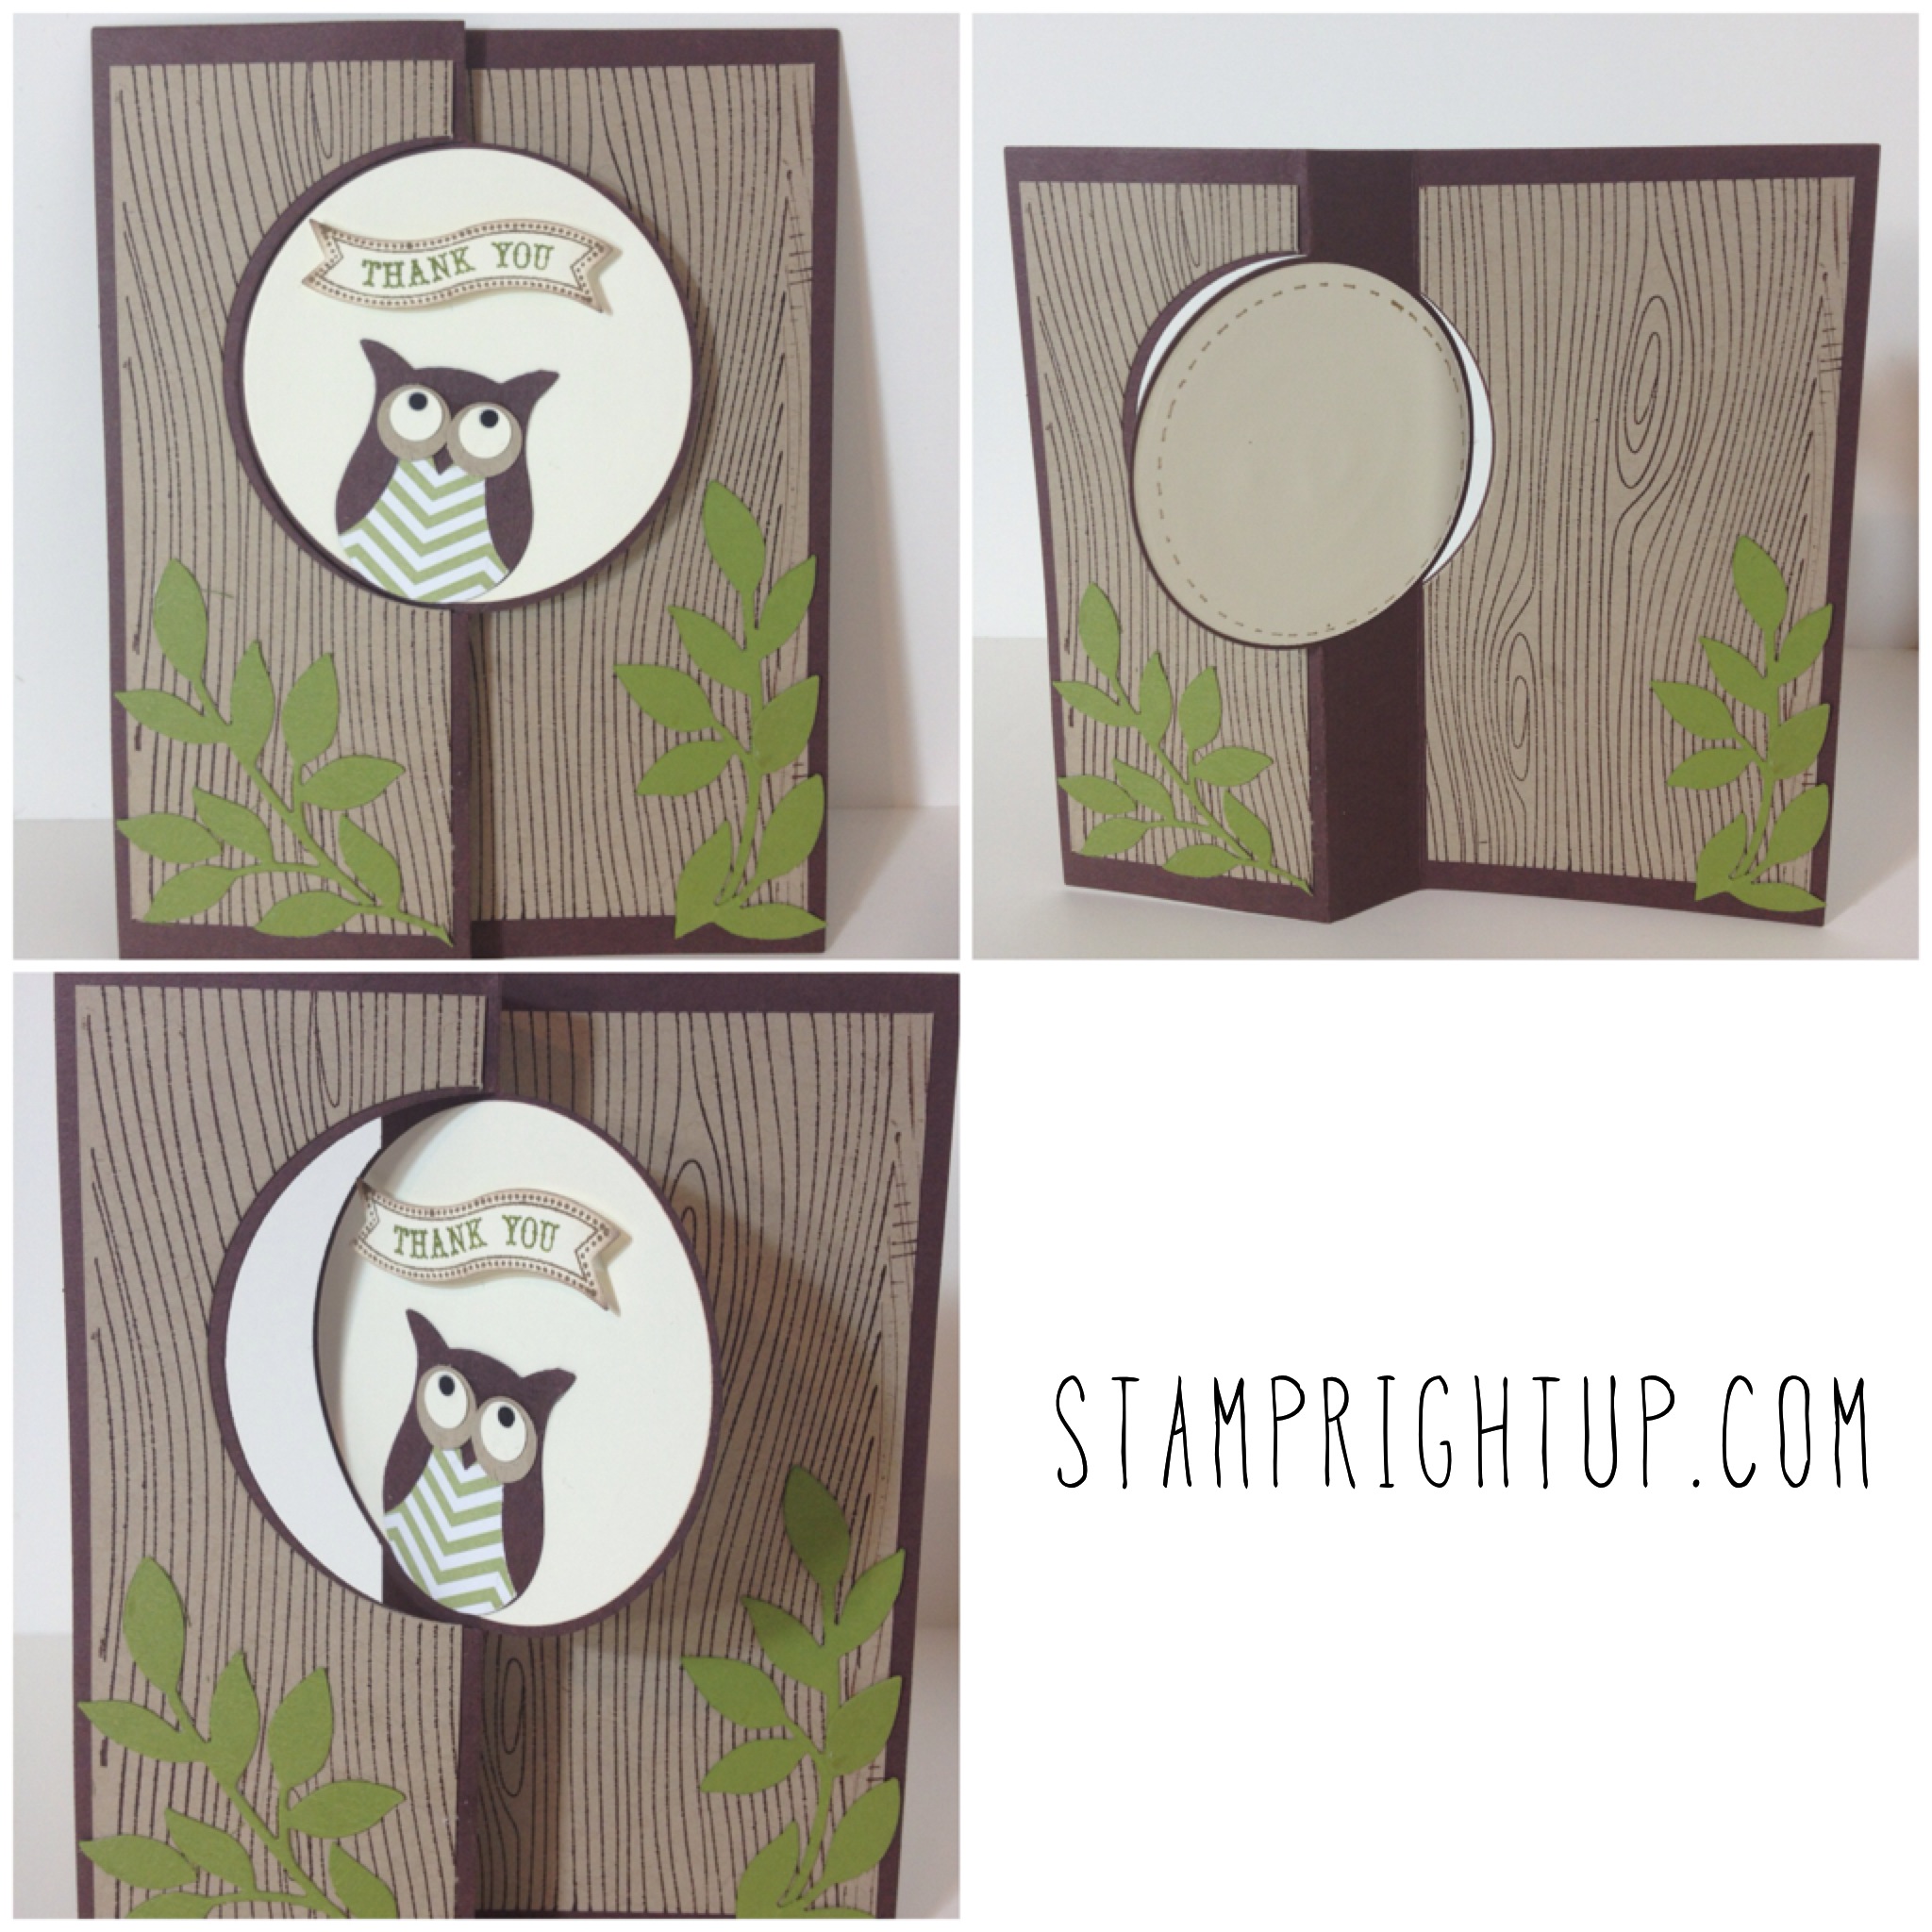
Here is the second card using the Stampin Up circle thinlit flip it die card that we made

Stampin Up Open Sea Circle Thinlit swing flip it card

Stampin Up Open Sea Circle Thinlit swing flip it card


I saw a card similar to this on Pinterest and I knew I had to make one in a workshop!  It was a little more intricate that I expected, but when the group was done they knew why it was worth the work!

If you are located in Canada and would like to order this circle thinlit die, or anything else from Stampin Up I will include the tutorial on how to make this card for free with your order!


Stampin Up Circle Thinlit & Owl Punch Card

I was so excited when Stampin Up came out with these Thinlit flip-it style cards.  Each thinlit comes with various accessory dies.  I was super excited when I figured out that the scallop that comes with the circle thinlit bundle is exactly the same as the largest scallop punch (which I did not yet own)

Using the circle thinlit bundle, I made this card using the owl punch.  It is a bit of a learning curve to figure out how to cut the second layer, but once I figured it out I was quite happy with the result.

Once I make a few more of these cards, I will be posting a tutorial using these thinlits.  Be sure to stay tuned for that!

TIPS & TRICKS (PART 1)

  • I have found that if you use a 12×12 sheet of paper you will have considerably less paper waste / scraps left over.
  • For the base, if you do NOT have a magnetic platform for your Big Shot, cut a piece of paper 1/8″ longer than needed
  • For the second layer – I cut the crumb cake at 5 1/2 x 5, then trimmed any excess of the top & bottom
  • You can use your 2 1/2″ circle punch for the middle circle – it will leave about a 16th of an inch space as you can see below
  • The scallop die is exactly the same as the 2 3/8″ scallop punch in the annual catalog
Stampin Up Circle Thinlit & Owl Punch

Stampin Up Circle Thinlit & Owl Punch

Here is what I used to make this card:

STAMPS:

  • Wood grain background stamp
  • Itty Bitty Banners

INKS:

  • Chocolate chip
  • Baked brown sugar (markers – on sentiment banner)
  • Old olive (markers – on sentiment banner)

PAPER:

  • Chocolate chip
  • Crumb cake
  • Very Vanilla
  • Old olive (for leaves)
  • WIld wasabi DSP (for owl vest)
  • black (for eyes)

TOOLS:

  • Owl punch
  • 2 1/2 ” circle punch
  • Little leaves framelits

I scream, you scream for ICE CREAM card tutorial

It’s summer time in Montreal, and it is HOT outside!  NOTHING makes a kid scream louder than hearing the ice cream truck coming down the road.

I was inspired by a card made by Andrea on her website, this card just has summer written all over it.  I have sold this card to stores, and I personally just LOVE this card, so I wanted to share the love by creating a tutorial for you!  Scroll down to download the free tutorial with step by step instructions on how to make this card yourself.

Stampin Up Ice Cream birthday card made with Cupcake builder punch & pennant parade punch

Stampin Up Ice Cream birthday card made with Cupcake builder punch & pennant parade punch

CLICK HERE TO DOWNLOAD TUTORIAL

Please don’t forget to post the link to your blog post in the comments when you share your creations so I can see all of your wonderful creations!

Here is what I used to make this awesome card:

Stamps:

  • Pennant Parade
  • Itty Bitty Banners

Inks:

  • Baked Brown Sugar
  • Pretty In Pink
  • Strawberry Slush
  • So Saffron
  • Pink Pirouette
  • Versa Mark

Tools:

  • Cupcake builder punch
  • Pennant parade punch
  • Itty Bitty Banners framelits
  • Bakers twine
  • Pumpkin Pie Button (brights collection)

Paper:

  • Just Add Cake DSP (card layer)
  • Subtles stack DSP – pretty in pink (top scoop ice cream)
  • Certainly Celery card stock (card base)
  • So Saffron card stock (pennant layer)
  • Strawberry slush card stock (bottom scoop)
  • Pretty In Pink (middle scoop)
  • Crumb cake (cone)
  • Cherry Cobbler (cherry)
  • Coastal Cabana (happy birthday banner)

❤ As always, your comments & feed back are welcome ❤

Wedding By The Tide Stampin Up Style

A friend of mine recently asked for a custom card for a beach side wedding she was attending.  I knew that it just had to be the “By The Tide” set by Stampin Up… I just didn’t know WHAT, or HOW.

Here is what I came up with after quite a bit of tinkering:

Beach wedding card - Stampin Up's By The Tide

Beach wedding card – Stampin Up’s By The Tide

Here is the list of materials I used to make this card – Stamp Right Up – Beachside Wedding By The Tide Tutorial

  • Card stock:
    • Crumb cake (4.25 x 5.5)
    • Pool party (4 x 5.25)
    • Very Vanilla
  • Misc:
    • Dimensionals
    • Versamark
    • Dazzling details
    • Gold embossing powder
    • Embossing buddy
    • Sponges / daubers
  • Stamps:
    • By The Tide
    • En Francais
  • Inks:
    • Crumb cake
    • Soft Suede
    • Calypso coral

Don’t forget to leave a comment below – your comments and feedback are welcome and appreciated!

Stampin Up Pun Fun & Sizzix Flip-it dies tips

I recently made this card for one of my stores that I sell to – it is such a fun card to make!!!

Using Stampin Up’s “Pun Fun” (now retired), I colored the rocket with water color pencils, fussy cut it then popped it up on the base. Using the stamp itself for revference, I hand drew all the little details in fine pointed black pen. Sentiment is from Paper Smooches.

The sizzix Flip-It die was sued to make the base & layers – I trimmed a second color (daffodil delight) down to fit.

**QUICK TIP ON HOW TO CORRECTLY USE THE SIZZIX FLIP-IT DIE**

Have you found that the die was cutting all the way through your card stock – or that the flip-it die cards were falling apart at the scored lines?! I did. It was heartbreaking to go through all the work to make the card just to have it fall apart. So I did some research:


  • Use ONE cutting plate and your CREASE pad!!!  Youtube video’s and other websites will tell you to use two standard cutting plates, but that second plate is what makes the difference.
    • Put your crease pad on the bottom, your Sizzix Flip-It die in the middle, then your card stock and your cutting plate on top.  That should fix any cutting through, or tearing of your scored folds.


Stampin Up Pun Fun with Sizzix Flip-It die

Stampin Up Pun Fun with Sizzix Flip-It die

Stampin Up with Lovely As A Tree

Did you know that Stampin Up’s “Lovely As A Tree” set has been around since 2006?!  Generally, sets are retired about every two years.  THIS set has made the cut year after year, and I can see why!!

Not only is it truly ‘lovely’, but it can be used for so many different occasions and holidays.  I can’t think of any other set in my craft room that is as versatile as this one.

I just received this set last week, and I knew I had to tinker with it!  Based off a tutorial by Dawn I used a piece of window sheet (clear acetate) to create this card:

Lovely As A Tree Reflection Technique

Lovely As A Tree Reflection Technique

Here is what I used to create this card:

  • Stamps:  Stampin Up:
    • Lovely As A Tree (Page 78, #127793 clear mount),
    • Teeny Tiny Wishes (page 44 #127802 clear mount)
  • Ink:
    • Soft Suede (trees)
    • Old olive (‘grass’ area)
    • Marina Mist ((water / reflection area)
  • Card stock:
    • Crumb cake
    • Old olive
    • Chocolate chip
    • Naturals very vanilla (for inside panel)
  • Other tools:  Wood grain embossing folder, window sheets / clear acetate, linen thread, 1/16″ hole punch

Like this card?  YOU can make it too! Contact me anytime to place an order – I can have it delivered anywhere in Canada in as little as 4-5 days!

Swallowtail Butterfly Card Set

Stampin Up Swallowtail card set

Stampin Up Swallowtail card set

A friend helped me get some info that I needed recently & I wanted to make her a thank you card.  I had seen a similar card to my night of navy version somewhere in my meandering, and I thought I would see what other color options worked with this design.

Here is what I used for these Swallowtail stamped card sets:

STAMPS:

  • Swallowtail stamp (PG 71, current Stampin Up Catalog)
  • En Francais background stamp (Current Stampin Up catalog)
  • Tiny tags (retired)

COLOR:

  • Crumb cake (background ink & cardstock base)
  • Night of Navy
  • Island Indigo
  • Bravo Burgundy

Just a quick post today to share with you all what I have been up to this gloriously sunny weekend.

Until next time stampers!

** Love these cards but don’t have the time to make them yourself?  All of my work is available for purchase in my Etsy store.  **

Manly Masculine All Occasion Cards Tips

Masculine or manly card are always so difficult to come up with.  Most stamps that are ‘masculine’ are very traditional – so I found I had to think outside the box when coming up with masculine cards.

Tips on making a card masculine:

  1. Use masculine colors:  this includes ALL neutrals as base colors.  Add splashes of regals for accent colors.
  2. Keep layouts simple.  WE (ladies) love ribbon, bling and sparkles… I know that men may not appreciate embellishments as much as we do.  SO, if you’re going to add embellishments to a masculine card –
    1. use base metal colored brads
    2. making knots with your ribbon, rather than bows
    3. use wood buttons

I have the best boyfriend in the world.  He is SOOO supportive of me with my Stampin Up endeavors and is always ready to help out.  For my last “Boys & Babies” card workshop, he sat at the table with me and punched 50 little circles for the wheels on the baby pram cards, then put the right number of punched out pieces in each card kit – he even knew how to punch and optimize the paper so there was no waste.  Whaddda sweetie!!

So to thank him I made him this card.  I LOVE the new ‘smoky slate’ grey from Stampin up – I used a retired background stamp, stamped in smoky slate ink on whisper white & smoky slate card stock.


Stampin Up Manly Masculine Card

Stampin Up Manly Masculine Card


Do you have any great masculine cards that you have made? I would love to see your work too!  Comment below with a link to your blog ❤


Until next time stampers!

Stampin Up Cake Pops

Hi Stampers!

Here is what I have been up to lately:  CAKE POPS!!

Cake Pops with Stampin Up for Father's Day gift treat

Cake Pops Stampin Up style for Father’s Day gift / treat

These were actually for my partner, who was returning from a week long business trip – I wanted to make something special for him, and I knew he had a sweet tooth.

It occurred to me while I was making them that this would also be a GREAT Father’s day gift as well.  It could be a fun thing for Mom’s to do with kids to make the cake pops, then Mom could get in there with her Stampin Up gear and make the labels.

These are a great manly / masculine gift period – I found the trick is to make sure you use ‘manly’ colors – like the brown sprinkles and neutral colored tags etc.

I pretty much used half of my craft room for this – but you could really use ONE stamp set and they would still look great!

Here is the list of Stampin Up tools I used:

STAMPS:

  • Postage Due
  • Chalk Talk
  • ** I’m missing a few – I will have to check the exact name – stay tuned **

INKS:

  • Crumb Cake
  • Night of Navy
  • Real Red

PUNCHES:

  • Postage stamp
  • Petite curly label
  • 1/2″  circle
  • Chalk talk framelits
  • XL oval
  • Small & large tag punch (retired)


The cello bags came from the dollar store along with the curly ribbon. The candy melts & lolly sticks we got at Michaels.  I made the cake pop stand out of a styrofoam block (also from Michaels) and I wrapped it in kraft paper (meant for sending parcels) and put a ribbon around it to cover up the tape a little bit 😉


**HELPFUL HINTS & TRICKS FOR THIS CAKE POP PROJECT**

  1. The recipe on the Duncan Hines website states to use half the icing tub – I actually only used a QUARTER of the tub.  Using half would probably make your cake pops a little too moist and they may fall off the stick while you are trying to coat them.  Try adding a tablespoon at a time until the mix is moist enough to make a into ball.
  2. To melt the (Wilton) candy / chocolate: use the DEFROST button on your microwave if you do not have a double boiler.

Both of these tips are crucial to the success of your cake pops!  I tried to make cake pops before and it was a disaster.


I am happy to share any info you would like that I may have missed here – simply leave me a comment!

Until next time stampers!


10 minute treat favor / goodie bags

For my latest workshop to celebrate the new catalog, I prepared a little thank you gift for the attendees.  I wanted something that everyone could use, and that looked great, but was still within my budget – so I made these great goodie bag / party favors with a few basic tools.

Treat Goodie Bag Party Favors Stampin Up

Goodie bag party favors to workshop attendees

What you need to make these party favor goodie bags:

  • Big Shot / die cutting machine
  • Top Note die
  • DSP / card stock
  • Ribbon
  • small clear cello bags (I got mine at the dollar store)
  • shredded tissue paper (dollar store again)

* TIP*  I stuck my embellishments to a piece of clear acetate to make sure that the presentation would be perfect.

I made the embellishments from the new “Buttons & Blossoms” clay molds available in the new Stampin Up catalog.  Using the freshly pressed 2013 – 2014 In Color line, these are the greatest thing I have seen in a looooong time for crafting!!  I hate it when I cannot find embellishments to match my project colors.  NOW you can make your own!!  ALl you need is the clay (which goes a LONG way – at least 60 embellishments from one bag of clay) and some reinkers.  Your total investment is around $20.  Just THINK of the savings!!! And the convenience… Need I go on?

Until next time stampers!!!

Keep calm, and craft on!!